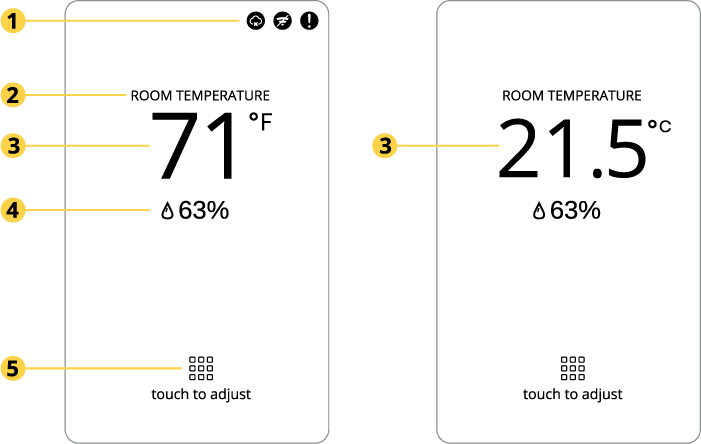
![]() This icon will appear when your thermostat is connected to your Pelican wireless mesh network, but is unable to connect to the Internet. Select the icon to be read a short alert message:
This icon will appear when your thermostat is connected to your Pelican wireless mesh network, but is unable to connect to the Internet. Select the icon to be read a short alert message:

Troubleshoot: When you see this error, you should verify that your Pelican gateway is properly installed, powered ON, and able to reach the Internet.
![]() This icon will appear when your thermostat is unable to find the Pelican wireless mesh network. Select the icon to be read a short alert message:
This icon will appear when your thermostat is unable to find the Pelican wireless mesh network. Select the icon to be read a short alert message:

Troubleshoot: When you see this error, you should finish installing the rest of your Pelican devices, to help expand the wireless network. If you have no more devices to install, a Pelican wireless repeater can assist in bridging this device into your network.
![]() This icon will appear when your thermostat is alerting you about one or more of the following. Select the icon to be read a short alert message:
This icon will appear when your thermostat is alerting you about one or more of the following. Select the icon to be read a short alert message:
1. Your thermostat has detected a wiring issue

Troubleshoot: When you see this error, you should check that the R, C, and D wire between your Pelican thermostat and its wiring module are properly connected and secure.
2. Your thermostat has detected a high CO2 level in the space.

Troubleshoot: There are no immediate actions to take when seeing this alert. If the alert is consistent, reach out to your Pelican Administrator for further assistance. The alert will auto clear when the CO2 level drops below its configured CO2 Warning Level.

![]() If your thermostat control screen says locked at the bottom, then your Pelican administrator has locked the thermostat through the Pelican Connect™ app.
If your thermostat control screen says locked at the bottom, then your Pelican administrator has locked the thermostat through the Pelican Connect™ app.
Even though the thermostat is locked, you can still see what the thermostat’s Heat to and Cool to temperatures settings are. We recommend working with your Pelican administrator to make sure the thermostat is being adjusted to the correct temperature setting for your needs.

If your thermostat’s control screen says utility setback event is active, then your company has signed up to participate in a utility managed community demand response events. These events normally have specific participation requirements and offer incentives for participating. Before ending a utility setback event, contact your Pelican administrator.
Pelican does not automatically enroll any customers in to these type of events. To participate in utility setback events, your company must self-enroll.
![]() Cancel: Select cancel to keep your thermostat participating in the utility setback event.
Cancel: Select cancel to keep your thermostat participating in the utility setback event.
![]() End Event: Select end event to go to your thermostats temperature control screen. Note that the utility will see that the event was ended.
End Event: Select end event to go to your thermostats temperature control screen. Note that the utility will see that the event was ended.
What is a utility setback event?
These events are managed by your electrical utility and are designed to help reduce how much electricity is being used on the grid during periods where they anticipate high electrical usage. These are commonly called Demand Response or DR events.
What occurs during the setback event?
The utility sends a signal to your Pelican thermostat to automatically change its temperature set point and disable your HVAC equipment. Normally the thermostat set point adjustments are 2-4 degrees beyond your normally temperature settings.

If your thermostat’s control screen says window open, then the thermostat has been linked to a Pelican window sensor. Because the window is detected open, your thermostat has turned Off and will remain Off until the window is shut. Note that the a thermostat can be linked to multiple window sensors and will remain Off until all windows have been detected shut.
Contact your Pelican administrator if the window sensor needs to be adjusted or deactivate.

If your thermostat’s control screen says door open, then the thermostat has been linked to a Pelican door sensor. Because the door is detected open, your thermostat has turned Off and will remain Off until the door is shut. Note that the a thermostat can be linked to multiple door sensors and will remain Off until all doors have been detected shut.
Contact your Pelican administrator if the door sensor needs to be adjusted or deactivate.
![]() Select this button to decrease the cool set point; cool your room further.
Select this button to decrease the cool set point; cool your room further.
![]() Select this button to increase the cool set point; cool your room less.
Select this button to increase the cool set point; cool your room less.
![]() If you see this icon, you have reached the minimum or maximum temperature adjustment allowed by your thermostat. These limitations are set by your Pelican Administrator through the Pelican Connect™ app.
If you see this icon, you have reached the minimum or maximum temperature adjustment allowed by your thermostat. These limitations are set by your Pelican Administrator through the Pelican Connect™ app.
![]() Select this button to decrease the heat set point; heat your room less.
Select this button to decrease the heat set point; heat your room less.
![]() Select this button to increase the heat set point; heat your room more.
Select this button to increase the heat set point; heat your room more.
![]() If you see this icon, you have reached the minimum or maximum temperature adjustment allowed by your thermostat. These limitations are set by your Pelican Administrator through the Pelican Connect™ app.
If you see this icon, you have reached the minimum or maximum temperature adjustment allowed by your thermostat. These limitations are set by your Pelican Administrator through the Pelican Connect™ app.
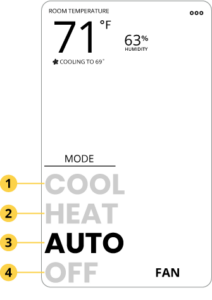
![]() Auto: Your thermostat will automatically switch your system between heating and cooling, as needed, to maintain the room temperature. You will have both Cool Room To and Heat Room To set points.
Auto: Your thermostat will automatically switch your system between heating and cooling, as needed, to maintain the room temperature. You will have both Cool Room To and Heat Room To set points.
![]() Heat: Your thermostat will only use heating to maintain the room temperature. You will see a Heat Room To set point.
Heat: Your thermostat will only use heating to maintain the room temperature. You will see a Heat Room To set point.
![]() Cool: Your thermostat will only use cooling to maintain the room temperature. You will see a Cool Room To set point.
Cool: Your thermostat will only use cooling to maintain the room temperature. You will see a Cool Room To set point.
![]() Off: When the thermostat is set to Off, the thermostat will only heat or cool the room if there is an active optimum start schedule. Otherwise, all heating, cooling settings will be disabled.
Off: When the thermostat is set to Off, the thermostat will only heat or cool the room if there is an active optimum start schedule. Otherwise, all heating, cooling settings will be disabled.
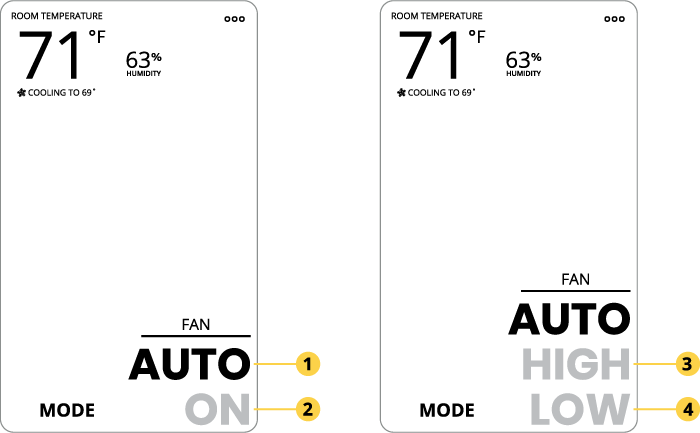
![]() Auto: Your thermostat will automatically turn your fan On during a heating, cooling, or ventilation cycle.
Auto: Your thermostat will automatically turn your fan On during a heating, cooling, or ventilation cycle.
![]() On: Your thermostat will turn the fan On.
On: Your thermostat will turn the fan On.
![]() High*: Your thermostat will enable the high speed fan.
High*: Your thermostat will enable the high speed fan.
![]() Low*: Your thermostat will enable the low speed fan.
Low*: Your thermostat will enable the low speed fan.
* High and Low speed fan are only available when the thermostat has been configured for this function and the unit it is wired to has two fan speeds.
![]() This icon will appear when your thermostat is connected to your Pelican wireless mesh network, but is unable to connect to the Internet. Select the icon to be read a short alert message:
This icon will appear when your thermostat is connected to your Pelican wireless mesh network, but is unable to connect to the Internet. Select the icon to be read a short alert message:
Troubleshoot: When you see this error, you should verify that your Pelican gateway is properly installed, powered ON, and able to reach the Internet.
![]() This icon will appear when your thermostat is unable to find the Pelican wireless mesh network. Select the icon to be read a short alert message:
This icon will appear when your thermostat is unable to find the Pelican wireless mesh network. Select the icon to be read a short alert message:
Troubleshoot: When you see this error, you should finish installing the rest of your Pelican devices, to help expand the wireless network. If you have no more devices to install, a Pelican wireless repeater can assist in bridging this device into your network.
![]() This icon will appear when your thermostat is alerting you about one or more of the following. Select the icon to be read a short alert message:
This icon will appear when your thermostat is alerting you about one or more of the following. Select the icon to be read a short alert message:
1. Your thermostat has detected a wiring issue
Troubleshoot: When you see this error, you should check that the R, C, and D wire between your Pelican thermostat and its wiring module are properly connected and secure.
2. Your thermostat has detected a high CO2 level in the space.
Troubleshoot: There are no immediate actions to take when seeing this alert. If the alert is consistent, reach out to your Pelican Administrator for further assistance. The alert will auto clear when the CO2 level drops below its configured CO2 Warning Level.

Within the first 5 minutes after the thermostat was last powered On, the thermostat will allows you to set it to Conventional or Heat Pump by selecting the change button next to configuration. These configurations, as well as other thermostat configurations (zone damper, floating valve, 2-pipe fan coil, etc.), can be set at anytime through the Pelican Connect™ app. The default configuration is Conventional.
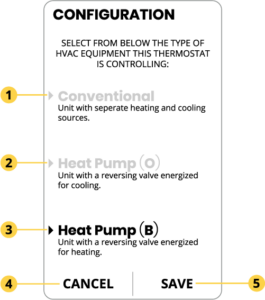
![]() Conventional: Select conventional if the thermostat is controlling the HVAC unit with the following outputs:
Conventional: Select conventional if the thermostat is controlling the HVAC unit with the following outputs:
- (G) Supply Fan Enable
- (Y) Cool Stage 1 Enable
- (W) Heat Stage 1 Enable
- (Y2) Cool Stage 2 Enable
- (W2) Heat Stage 2 Enable
![]() Heat Pump (O) : Select Heat Pump if the thermostat is controlling the HVAC unit with the following outputs:
Heat Pump (O) : Select Heat Pump if the thermostat is controlling the HVAC unit with the following outputs:
- (G) Supply Fan Enable
- (Y) Compressor Stage 1 Enable
- (W) Reversing Valve (Enable for Cooling)
- (Y2) Compressor Stage 2 Enable
- (W2) Auxiliary Heat Enable
![]() Heat Pump (b) : Select Heat Pump if the thermostat is controlling the HVAC unit with the following outputs:
Heat Pump (b) : Select Heat Pump if the thermostat is controlling the HVAC unit with the following outputs:
- (G) Supply Fan Enable
- (Y) Compressor Stage 1 Enable
- (W) Reversing Valve (Enable for Heating)
- (Y2) Compressor Stage 2 Enable
- (W2) Auxiliary Heat Enable.
![]() Cancel: Select cancel if you do not want to save the changes you made or if you do not want to change the thermostat’s current configuration.
Cancel: Select cancel if you do not want to save the changes you made or if you do not want to change the thermostat’s current configuration.
![]() Save: Select save to save the thermostat to the newly selected configuration.
Save: Select save to save the thermostat to the newly selected configuration.
Within the first 5 minutes after the thermostat was last powered On, the thermostat will allows you to set it to Conventional or Heat Pump by selecting the change button next to configuration. These configurations, as well as other thermostat configurations (zone damper, floating valve, 2-pipe fan coil, etc.), can be set at anytime through the Pelican App. The default configuration is Conventional.

![]() Humidify to: If your thermostat is set to control a humidifier, then set this to the lowest humidity level you want in the room.
Humidify to: If your thermostat is set to control a humidifier, then set this to the lowest humidity level you want in the room.
![]() Dehumidify to: If your thermostat is set to control a dehumidifier, then set this to the highest humidity level you want in the room.
Dehumidify to: If your thermostat is set to control a dehumidifier, then set this to the highest humidity level you want in the room.
![]() Cancel: Select cancel if you do not want to save the changes you made or if you do not want to change the thermostat’s current configuration.
Cancel: Select cancel if you do not want to save the changes you made or if you do not want to change the thermostat’s current configuration.
![]() Save: Select save to save the thermostat to the newly selected configuration.
Save: Select save to save the thermostat to the newly selected configuration.
![]() Select this button to decrease the humidity set point.
Select this button to decrease the humidity set point.
![]() Select this button to increase the humidity set point.
Select this button to increase the humidity set point.

![]() CO2 Alert: If your thermostat detects the CO2 level above the configure CO2 Warning Limit, it will show the alert icon next to the CO2 reading. This will remain displayed until the CO2 level drops below the CO2 Warning Limit. The CO2 Warning Limit configuration can be adjust at anytime through the Pelican Connect™ app.
CO2 Alert: If your thermostat detects the CO2 level above the configure CO2 Warning Limit, it will show the alert icon next to the CO2 reading. This will remain displayed until the CO2 level drops below the CO2 Warning Limit. The CO2 Warning Limit configuration can be adjust at anytime through the Pelican Connect™ app.