-
Pelican Connect
-
- Tips for Evaluating Notifications in the Pelican System
- Thermostat Notification Configurations
- Thermostat Unreachable
- Understanding a “Cool Failure” Notification
- Understanding a “Heat Failure” Notification
- Understanding an “Economizer Position Failure” Notification
- Understanding the “Door or Window Has Been Left Open” Notification
- Understanding Low Battery Notifications for Pelican Devices
-
Admin
-
- Can I pay for multiple site subscriptions at once?
- Can I pay for my subscriptions using a purchase order (PO)?
- How do I change my site type (residential, business, hotel)?
- How do I pay for my site’s subscription?
- What does the Standard Subscription provide?
- What is the Subscription Renewal History?
- Why has my subscription expired?
- How do I view my LTE Gateway Subscription Receipt?
- How do I change my LTE Subscription Email Address?
- How Can I Cancel My LTE Gateway Subscription?
-
Comfort Control
-
- How do I adjust a room temperature?
- How do I turn off all thermostats for an emergency?
- How do I turn ON-OFF cooling?
- How do I turn ON-OFF heating?
- How do I turn ON-OFF the Fan?
- What does Cool Running mean?
- What does Economizer Active mean?
- What does Fan Running mean?
- What does Heat Running mean?
- What does Space Satisfied mean?
- What does Waiting mean?
- Why did cooling start on its own?
- Why did heating start on its own?
-
- Directions on maintaining proper ventilation rates: COVID-19
- What is Outside Ventilation in a schedule?
- Does Pelican adjust an outside damper based on fan speed?
- How do I adjust the CO2 level to generate additional ventilation?
- How do I commission a PEARL for proper ventilation?
- How do I turn off ventilation for all thermostats on a poor outdoor air day?
- What are CO2 Levels?
- What do different CO2 levels indicate ?
- Does Pelican detect CO2 levels as a life safety system?
- How do I adjust my CO2 ventilation configuration?
- What is the Outside Ventilation setting?
-
-
Schedules
- Can I schedule a thermostat to a set points beyond its allowable heat or cool range? - not done
- Can I schedule when Fan Circulation Minutes is active?
- What is unoccupied setback in a thermostat schedule?
- How to set set fan to auto during unoccupied setback periods?
- How do I set an a single thermostat's schedule?
- What is Outside Ventilation in a schedule?
- What are the schedule Repeat options?
- What is optimum start?
- Why did cooling start on its own?
- Why did heating start on its own?
- Scheduling from Dusk to Dawn
-
- How do I create an event schedule for a single thermostat?
- How do I delete an event scheduled for a single thermostat?
- How do I create an event schedule for multiple thermostats?
- How do I edit a multiple thermostat event scheduled?
- How do I delete a multiple thermostat event scheduled?
- How do I edit an event scheduled for a single thermostat?
-
- How do I create shared schedules? - not done
- How do I edit a shared schedule?
- How do I create unoccupied set point override periods?
- How do I rename a shared schedule?
- How do I copy an existing shared schedule?
- How do I delete an existing shared schedule?
- How do I create an event schedule for multiple thermostats?
- How do I edit a multiple thermostat event scheduled?
- How do I delete a multiple thermostat event scheduled?
- Schedule Dashboard Feature Enhancements
-
Thermostat
-
- Can a Pelican thermostat control a floating actuator?
- Can a Pelican thermostat control a two-position actuator?
- Can a Pelican thermostat control a multiple fan speeds?
- Can I "lock-out" compressors based on an outdoor temperature?
- Can I disable or lock a thermostat’s Fan Button?
- Can I disable the thermostat’s internal temperature sensor?
- How do I hide a thermostat on the app?
- How does Pelican assist with freeze prevention?
- How do I control a dual fuel Heat Pump?
- How many Cool Stages do I select for a thermostat?
- How many Fan Stages do I select for a thermostat?
- How many Heat Stages do I select for a thermostat?
- What do I set Heat Needs Fan to?
- What is CO2 Ventilation?
- What is Compressor Lockout?
- What is Cool Range?
- What is Fan Circulation Minutes?
- What is Heat Range?
- What is the difference between Auxiliary and Emergency Heat?
- What should I set a thermostat’s Reversing Valve to?
- What should I set a thermostat’s System Type to?
- What should I set Anticipation Degrees to?
- What should I set Cycles Per Hour to?
- When should I use the thermostat Calibration Degrees?
- What should I set a thermostat’s Zone Controller configuration to?
- What should I set Fan Purge Cycle to?
- What should I set Damper Type to?
- What should I set Reheat Type to?
- What should I set Notification Settings to?
- How to hide a section within an article.
- How can I Delete a Thermostat from a site?
- How do I delete a Wired Temperature Sensor or PEARL Economizer Controller?
- How can I Replace a Thermostat?
- Show all articles ( 18 ) Collapse Articles
-
-
Networking
-
- How do I install a Pelican cellular gateway?
- How do I replace a Pelican Cellular gateway with a Pelican Ethernet gateway?
- Can I set a Pelican gateway for a static IP address?
- Do I need a Public IP address for a Pelican gateway?
- Does a Pelican gateway use a DHCP or static IP address?
- Does a Pelican gateway use Inbound firewall ports?
- How do I change a Pelican gateway from static back to DHCP?
- How do I install a Pelican Ethernet gateway?
-
PEARL
-
Zone Coordinator
-
- How does Pelican control a parallel fan powered box during a heating cycle?
- How does Pelican control a series fan powered box during a heating cycle?
- How does Pelican control a zone box during a heating cycle?
- How does Pelican control a parallel fan powered box during a cooling cycle?
- How does Pelican control a series fan powered box during a cooling cycle?
- How does Pelican control a zone box during a cooling cycle?
- How does Pelican control a parallel fan powered box during a ventilation cycle?
- How does Pelican control a series fan powered box during a ventilation cycle?
- How does Pelican control a zone box during a ventilation cycle?
-
Power Control
-
Sensors
-
OpenAPI
How do I turn off ventilation for all thermostats on a poor outdoor air day?
On Poor Outdoor Air Days, the Pelican Solution provides site Admins with a feature called Prevent Outside Ventilation. This feature will only work if Pelican is controlling the outside damper on your HVAC equipment. If a third-party product is controlling the outside damper, go down to the section: What do I do if Pelican is NOT controlling my outside dampers?
This option can be found under Admin > Shelter-In-Place. This feature should only be used on poor outdoor air days and never for non-emergency events or vacation periods. For non-emergency events or vacations periods, please use the appropriate thermostat schedule type (custom, shared schedule, event schedule, or vacation schedule).
Bad outdoor air days events are unpredictable. Because of this, preventing outside ventilation should be routinely checked and practiced to confirm proper operation. Pelican outside ventilation prevention is designed to assist in emergency situations and is not guaranteed to work correctly if it has not been routinely checked.
What occurs if I enable Prevent Outside Ventilation?
When Prevent Outside Ventilation is enabled, all Pelican thermostats (which the system is able to communicate with) will set their Outside Ventilation setting to OFF. The Fan and System settings will be unaffected (heating, cooling, and fan only cycles will still occur).
What does this do?
This sequence places the outside damper at 100% closed for thermostats that have PEARL’s wired to them. NOTE: Pelican must be controlling the outside damper for this feature to work! If third-party devices are being used the control outside dampers, go to the section below: What do I do if Pelican is NOT controlling my outside damper?
When would I use Prevent Outside Ventilation?
This feature should only be used on days where there is poor outdoor air quality. This feature will only work if Pelican is controlling the outside damper on your HVAC equipment. If a third-party product is controlling the outside damper, go to the section below: What do I do if Pelican is NOT controlling my outside dampers?
What do I do if Pelican is NOT controlling my outside dampers?
If your property has third-party devices controlling your outside dampers or the outside dampers are set for fixed positions, then there are three options we recommend during poor outdoor air quality days:
1. If you set all the Pelican thermostat Fan settings to AUTO, then the Fan will only run during Heating and Cooling cycles. Although this does not prevent ventilation, it does reduce ventilation rates to being only during heating and cooling periods, instead of active during the entire occupied hours of the day.
2. If you set all the Pelican thermostat System settings to OFF and Fan to AUTO, and LOCK the thermostats, then this will disable your entire site. This can be accomplished through thermostat schedules or by using the Shelter-In-Place sequence called Set All Thermostats to OFF. Note that this is a very dramatic setting change all it will prevent your tenants and staff from being able to run heating and cooling through-out the day. This is a good option for days when the property will be unoccupied due to poor air quality.
3. Go to each HVAC unit and manually disable the third-party outside damper controller or replace the third-party outside damper controllers with Pelican PEARLs.
How do I get to Prevent Outside Ventilation?
Only site ADMIN can access the Shelter-in-Place/Prevent Outside Ventilation section of a Pelican web-app.
1. In your Pelican App, open the Admin menu.
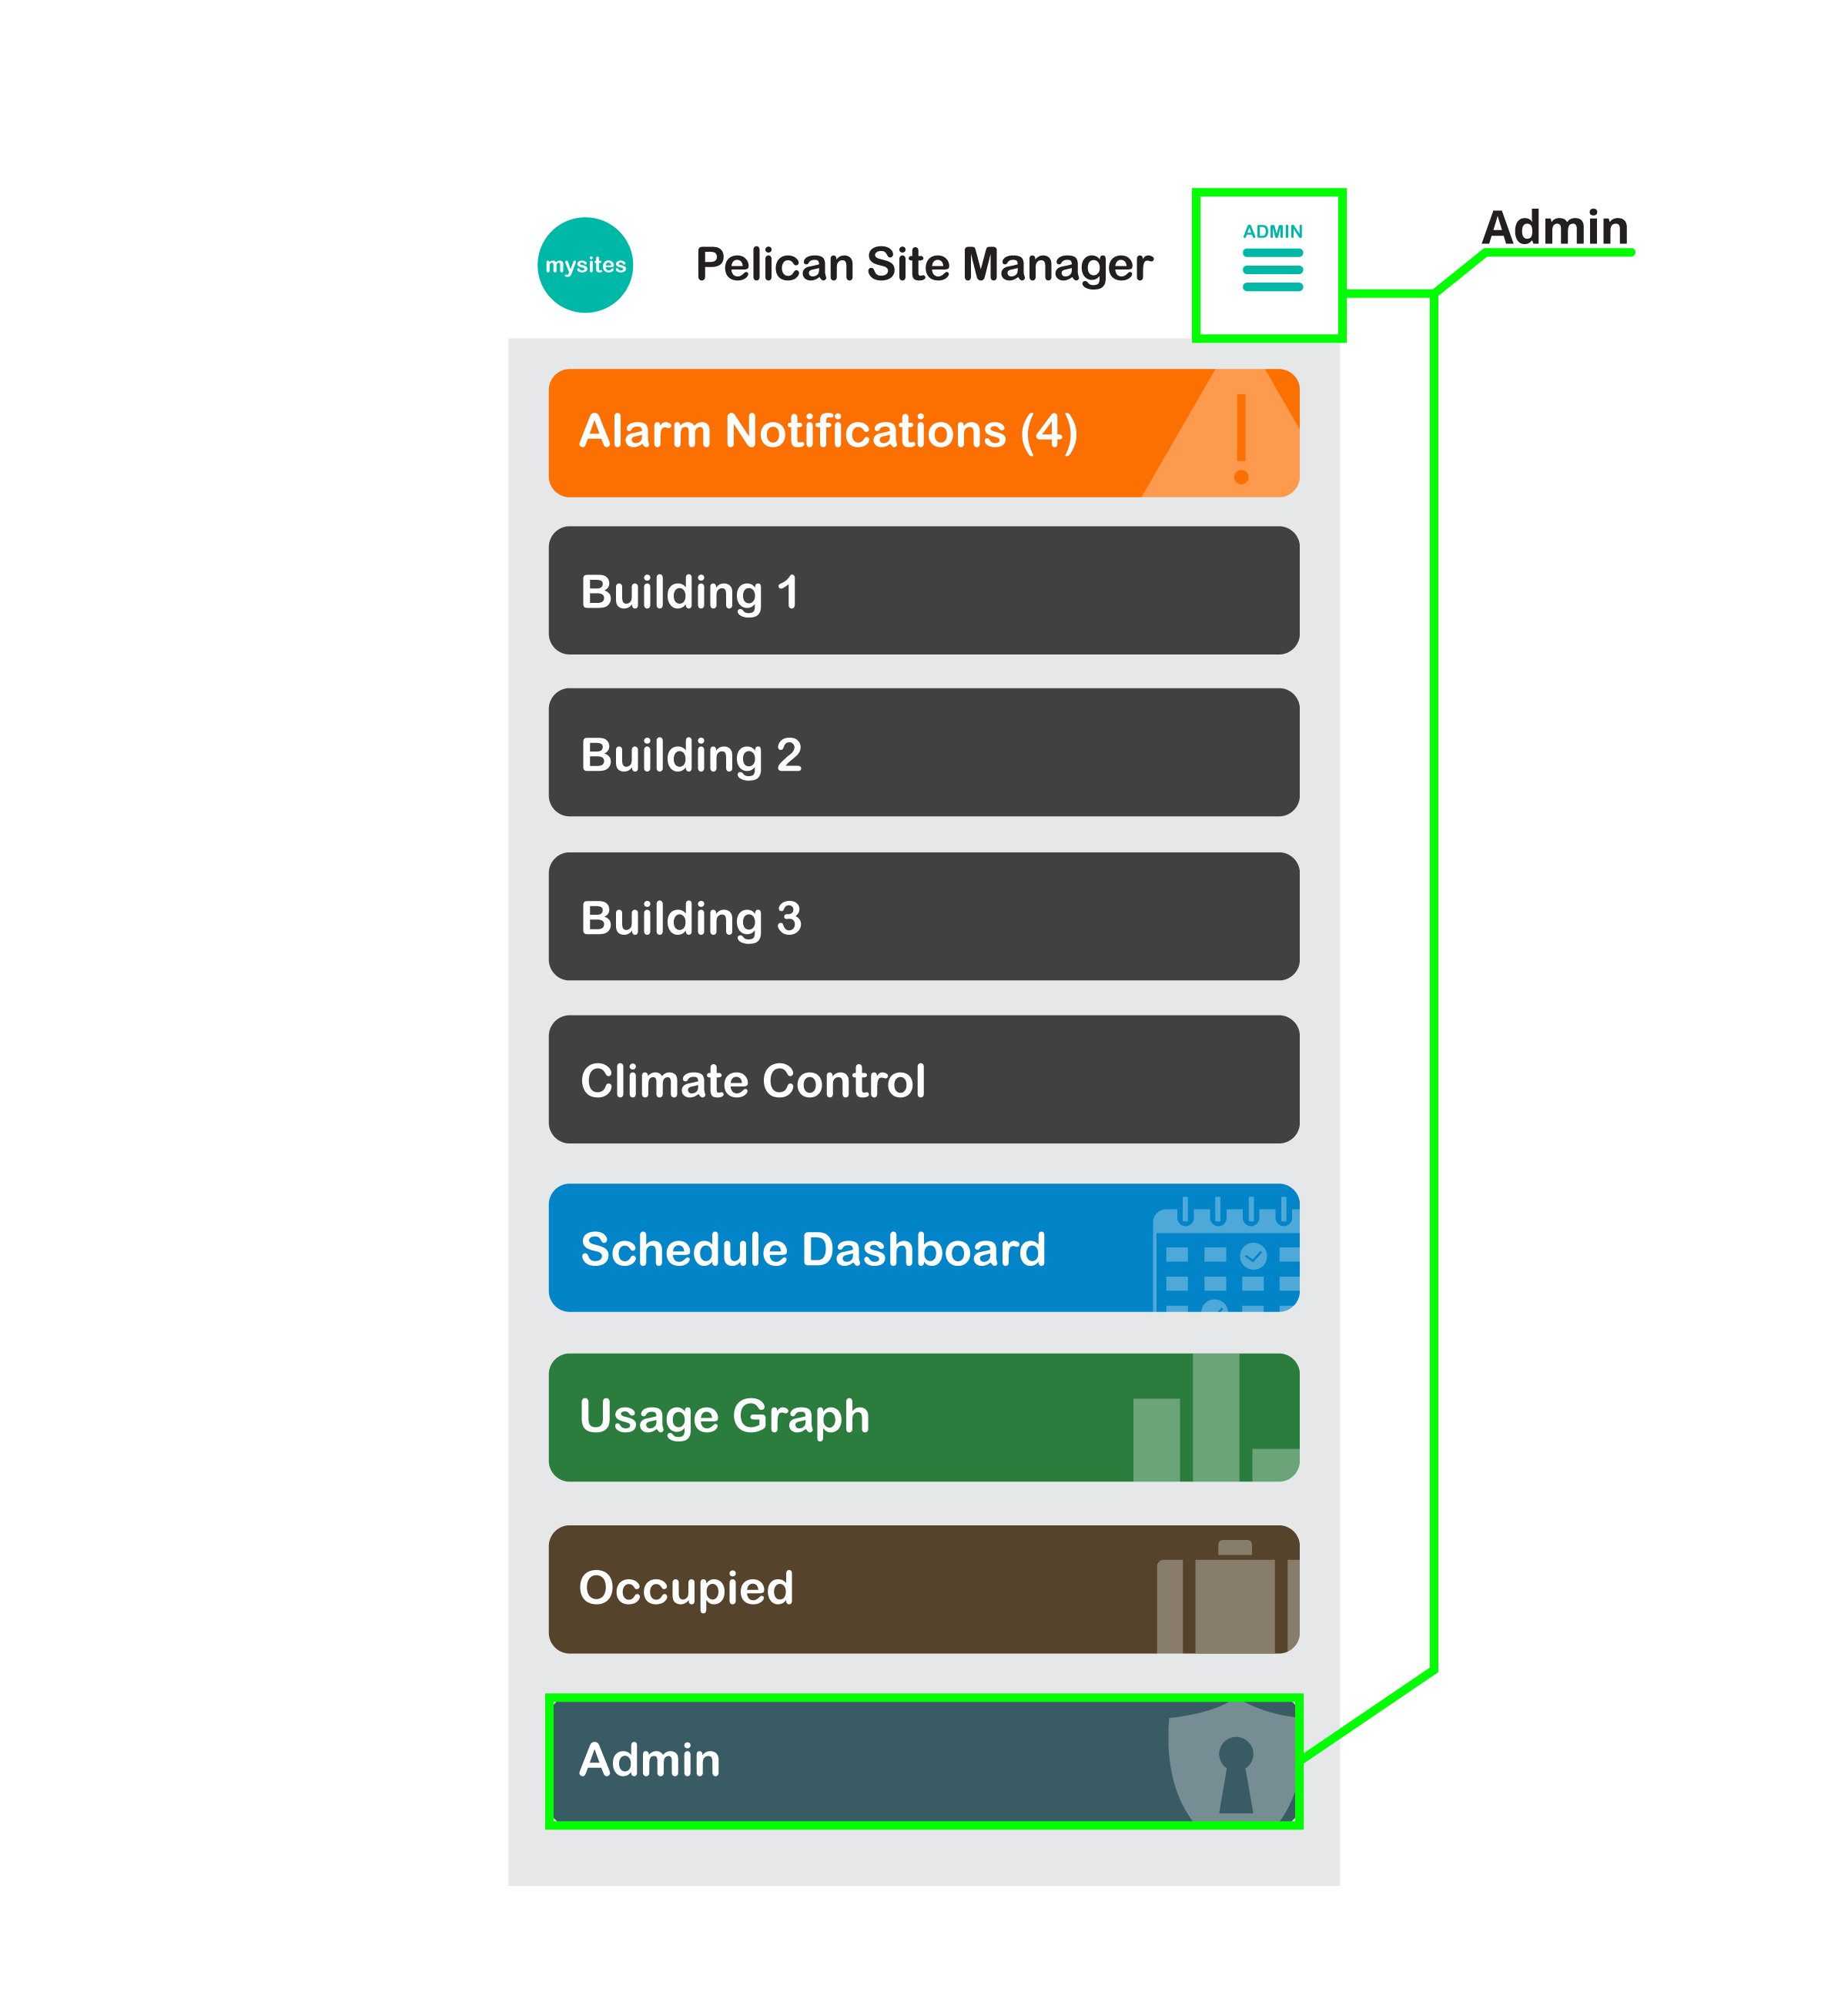
2. In the Admin Menu select Shelter-in-Place.
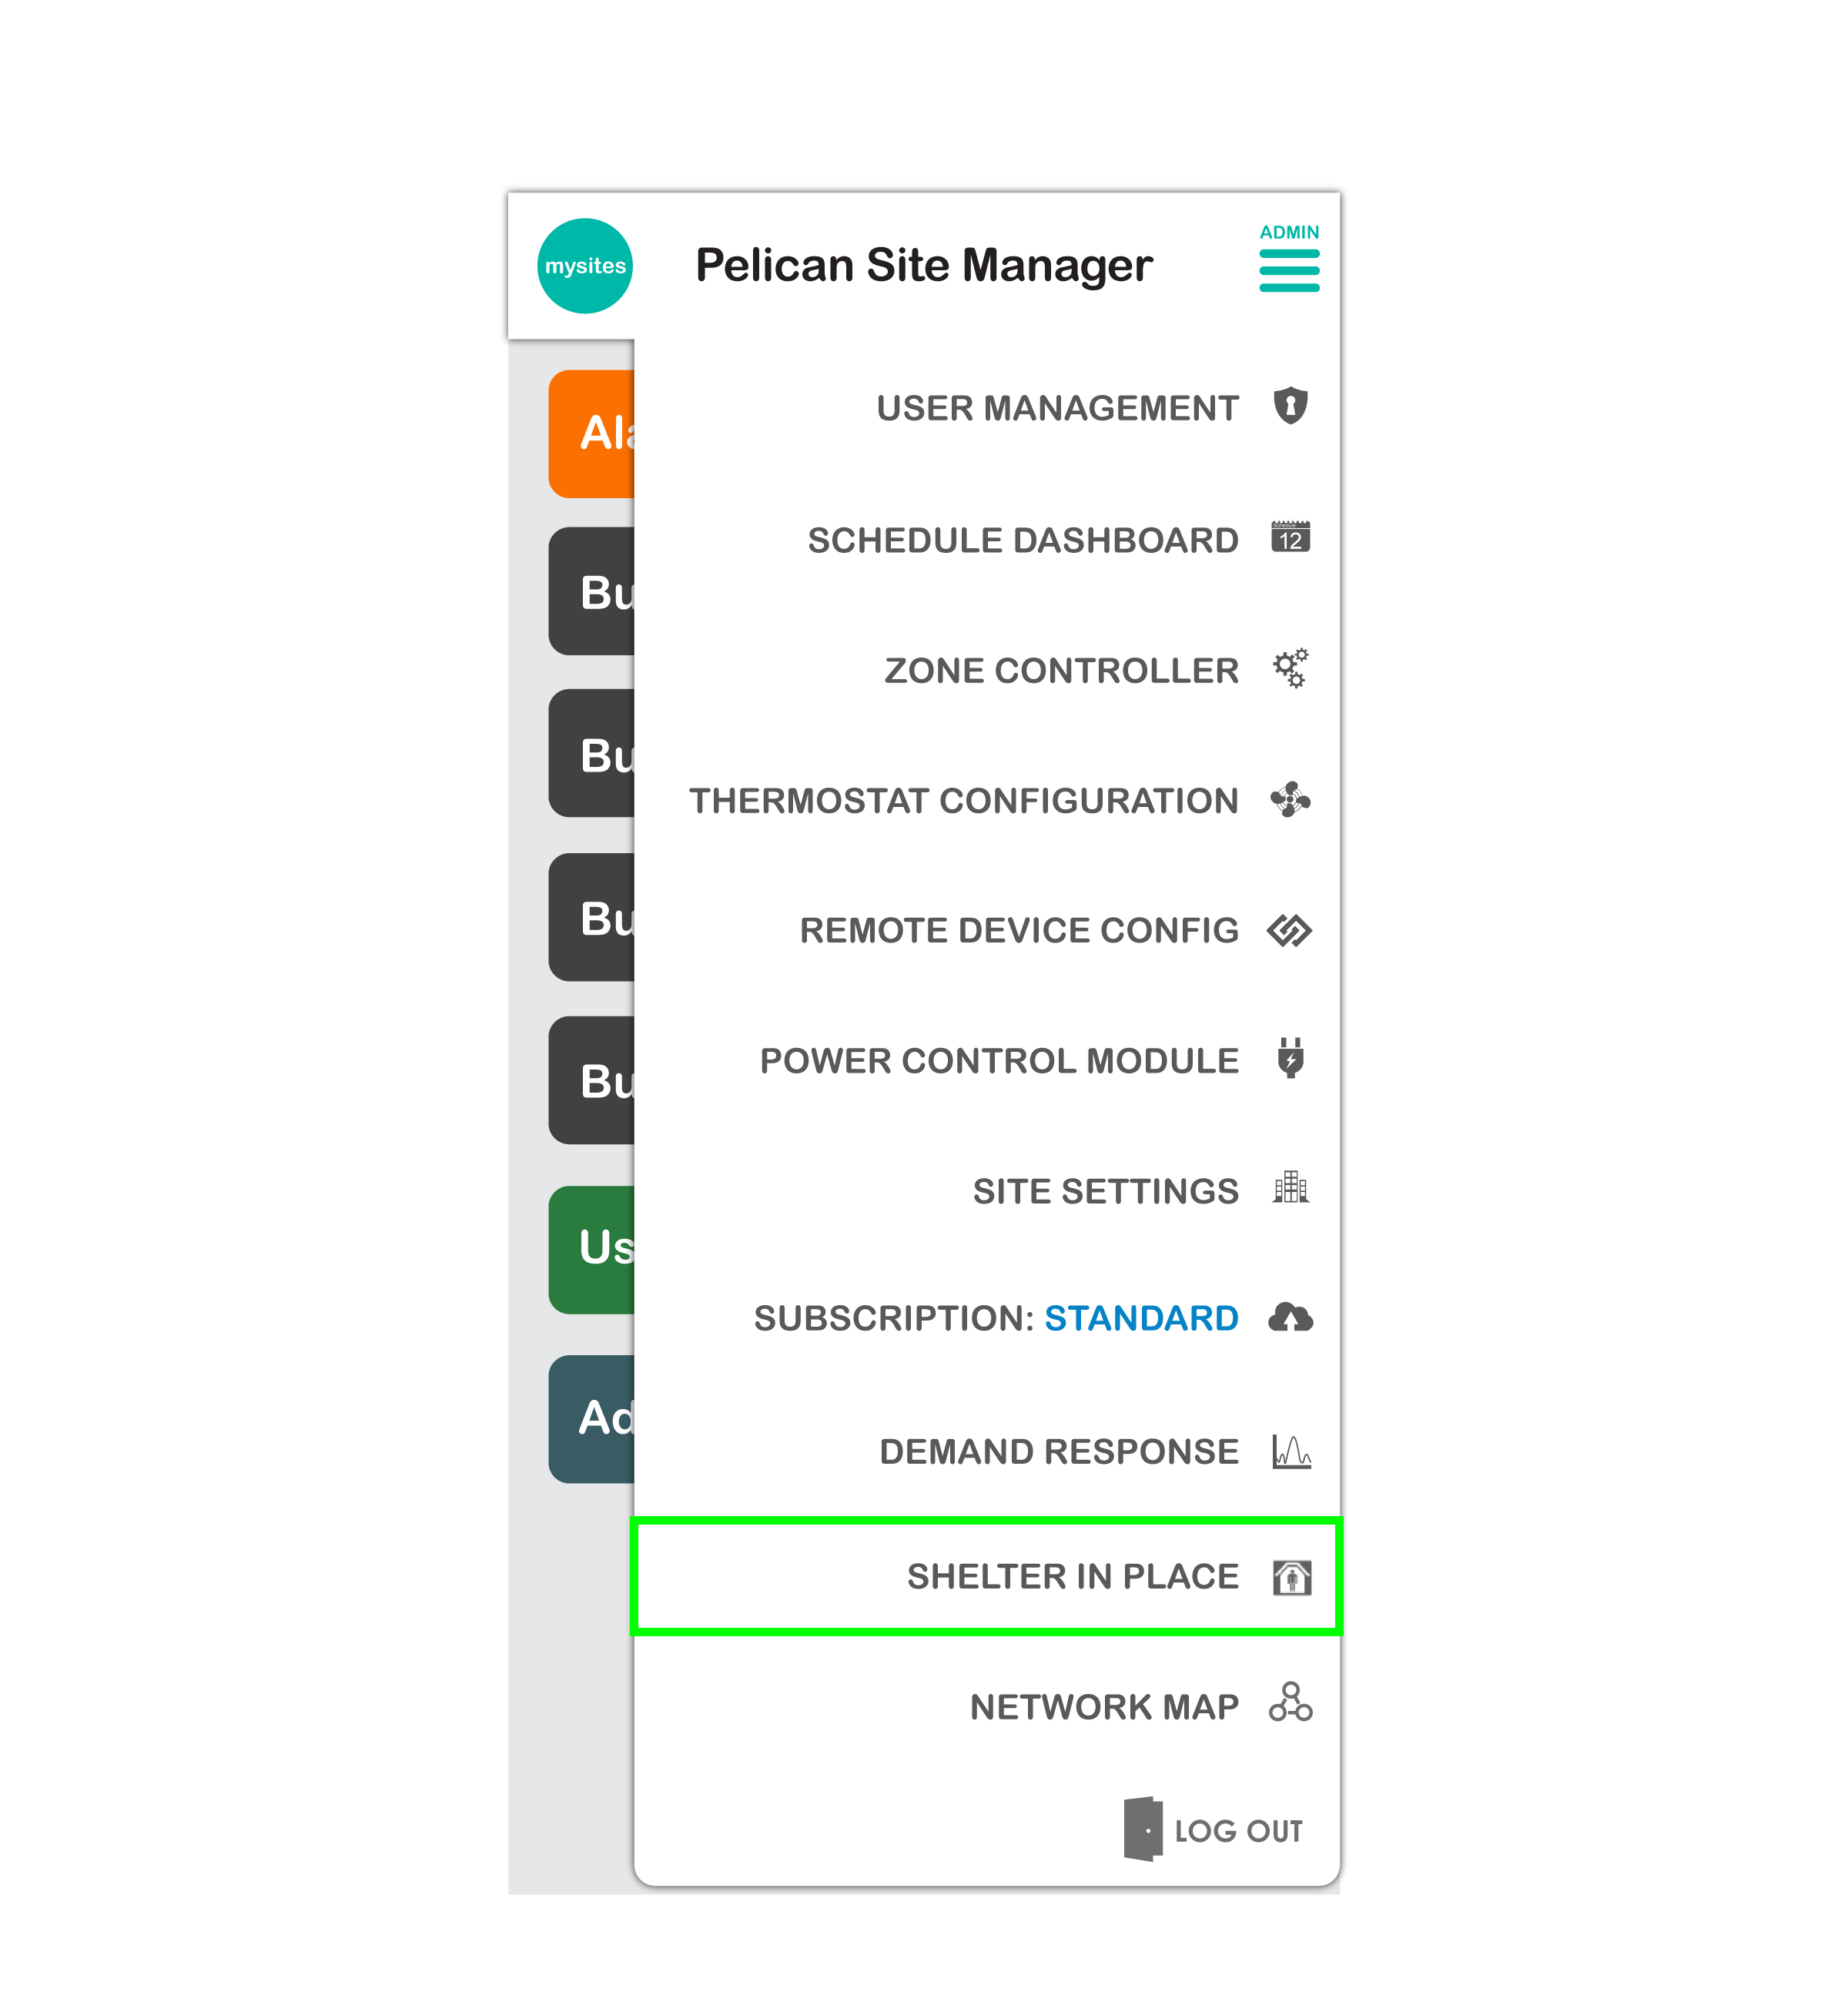
3. This will bring you to the Shelter-in-Place control section where you will see the Prevent Outside Ventilation button.
What steps do I take to enable Prevent Outside Ventilation?
Pelican Shelter-In-Place will ONLY affect HVAC equipment controlled by your Pelican solution. Independently controlled equipment will require manual disablement during emergency events.
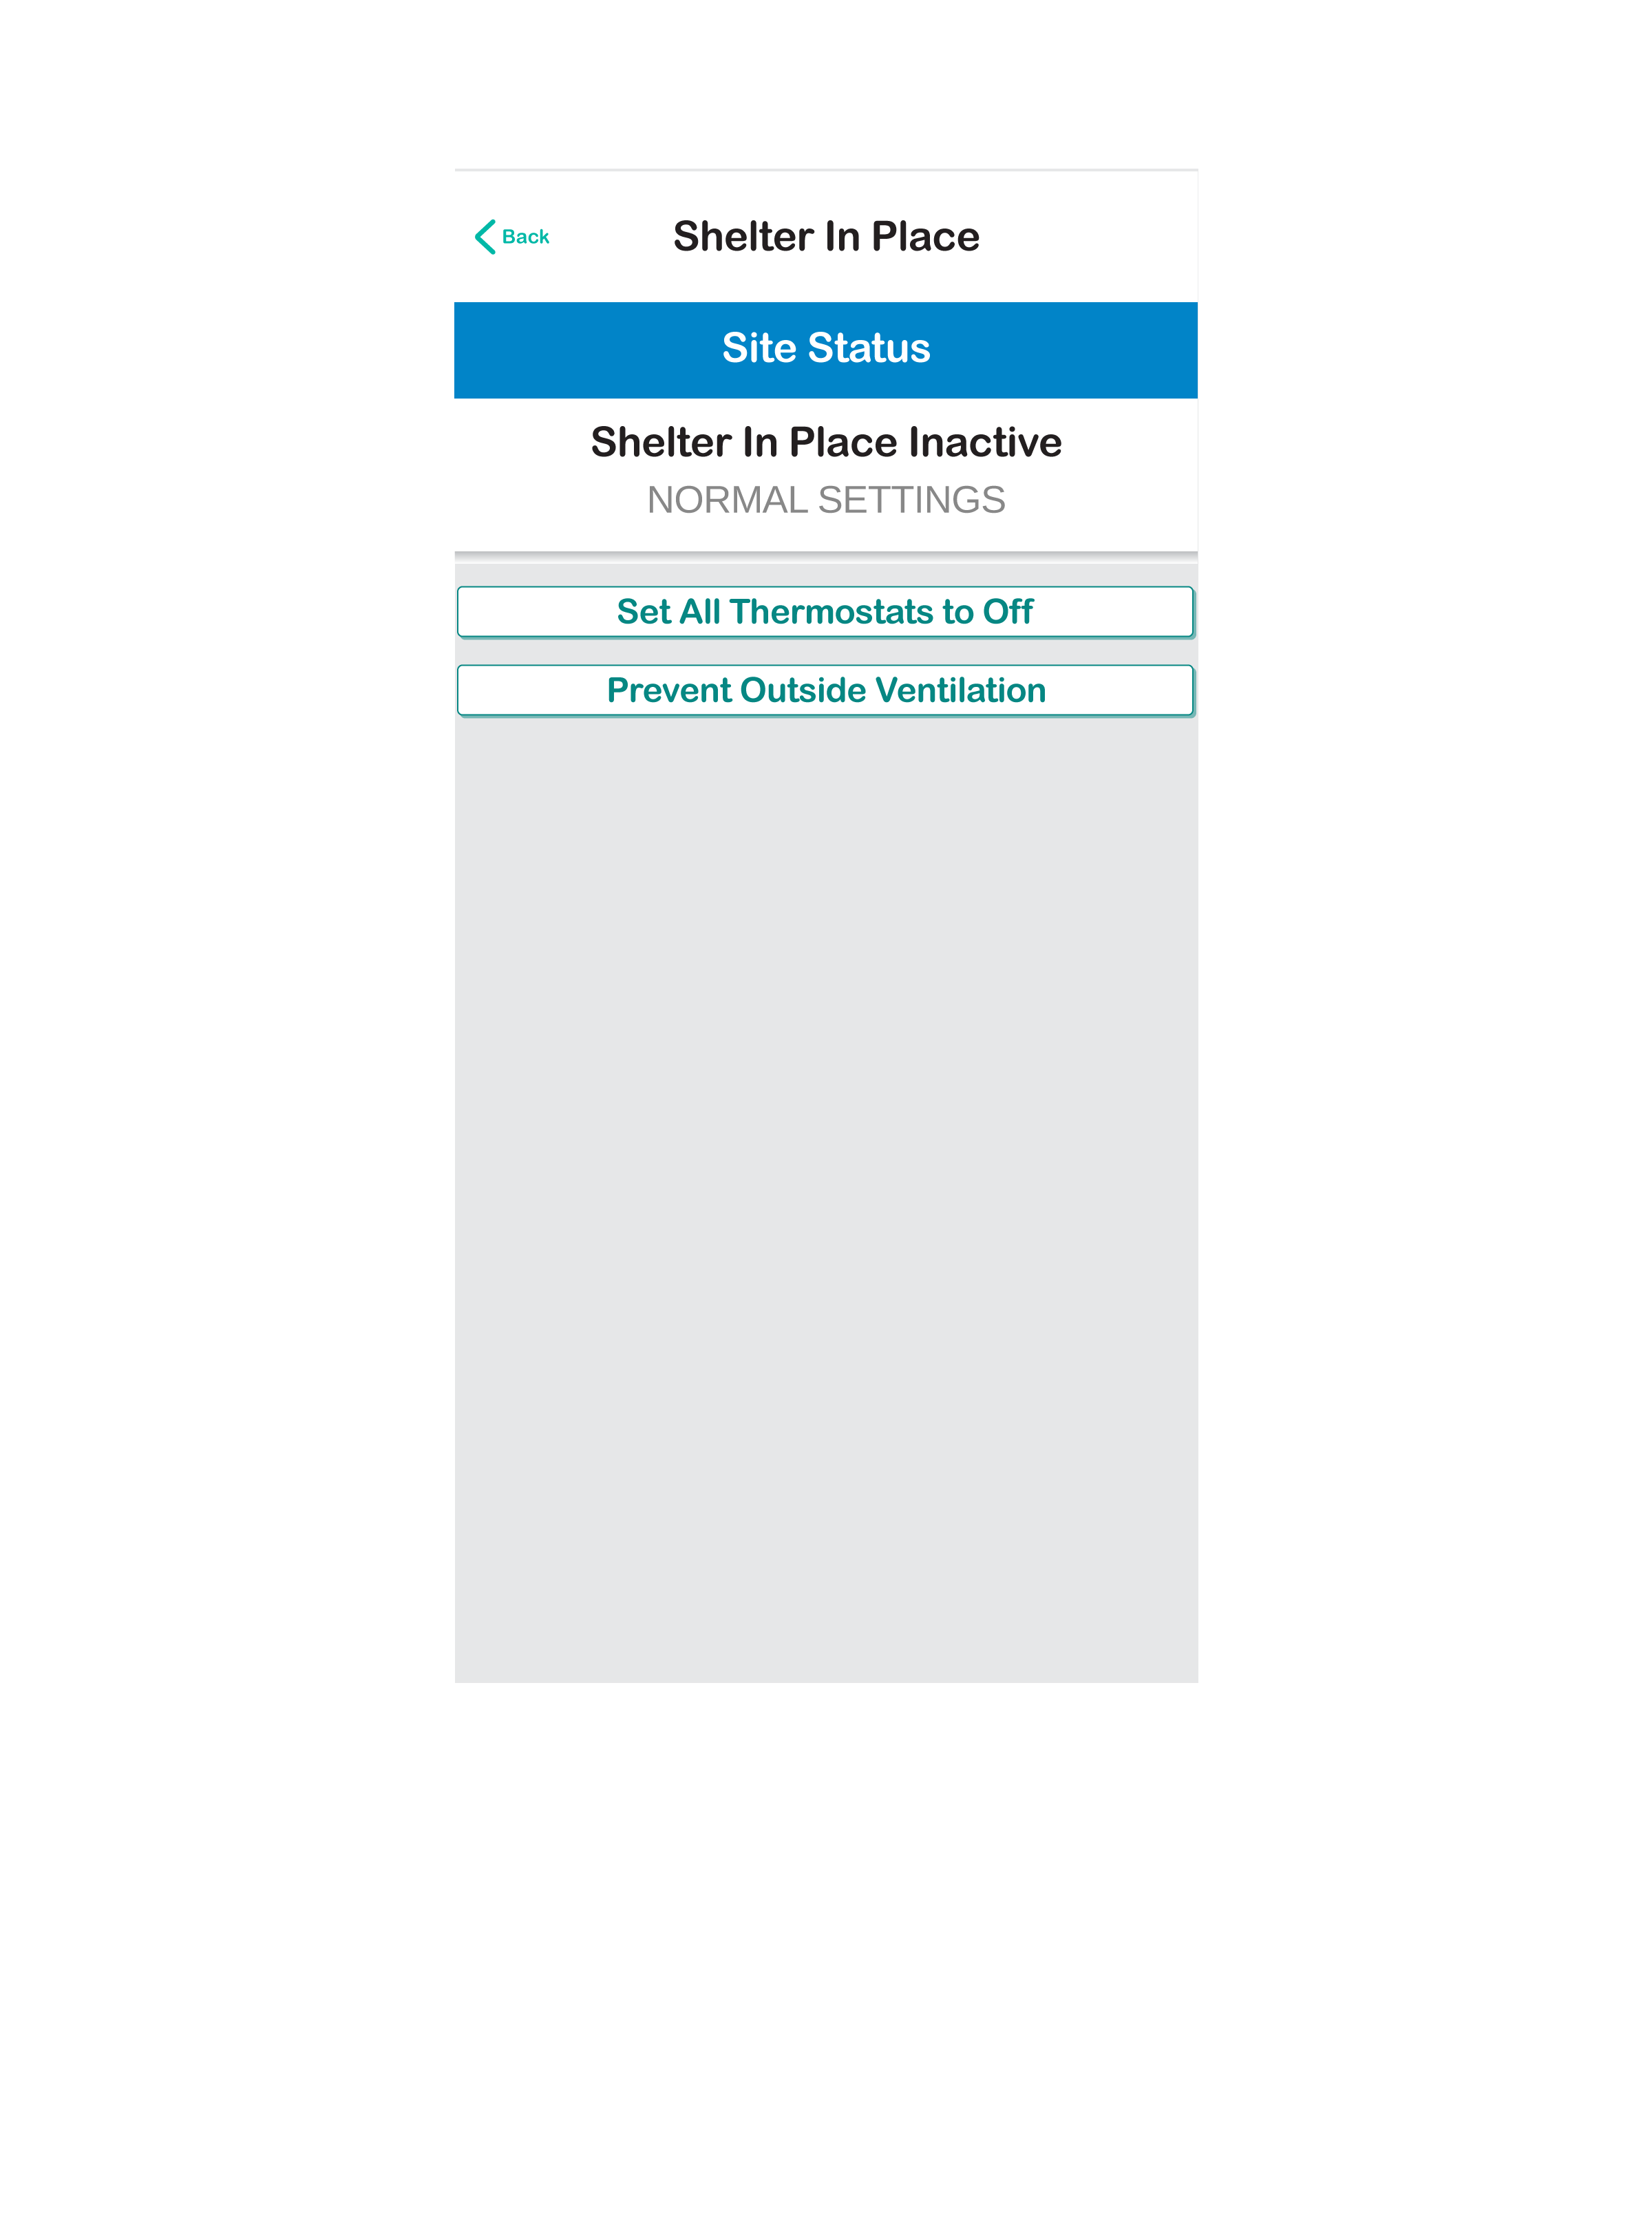
1. After navigating the the Shelter-in-Place page of your app, select Prevent Outside Ventilation.
2. A pop-up will appear asking for confirmation that you want to proceed with the prevent outside ventilation sequence.
Select Confirm to activate prevent outside ventilation or select Done to go back to the shelter-in-place control page and not move forward with the sequence.
3. If you press Confirm, your Pelican solution will begin sequencing all your Pelican thermostat to shut their outside dampers.
You will be directed to the app’s Main Page where you will see a new status stating: Prevent Outside Ventilation Active.
In most cases, outside dampers will quickly shut across your entire site. In rare cases there can be delays in getting the sequence to specific thermostat. It is important to incorporate a routine check for proper prevent outside ventilation operations into your preparedness planning to confirm the sequence works for all required thermostats.
How do I restore my system back to normal?
1. From the Main Page of your app select the Prevent Outside Ventilation Active button at the top of your page.
2. From the Shelter-In-Place management page, select Restore Normal Settings.
3. A pop-up will appear asking for confirmation to proceed with restoring your Pelican solution back to normal operation. Select Confirm to return to normal or select Done to remain in shelter-in-place.
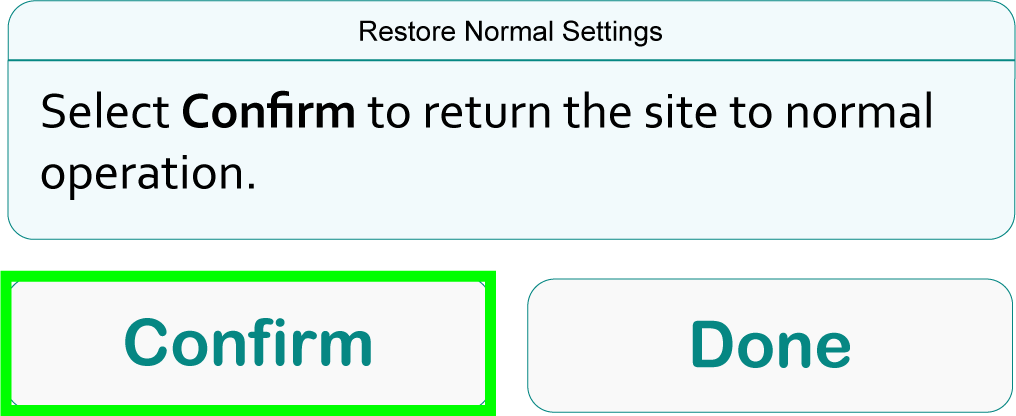
4. The ventilation status on your main page will states: Restoring Normal Settings.
When room’s are placed back into normal operation, they will adjust to the ventilation positions they would normally be at during that period for each thermostat.
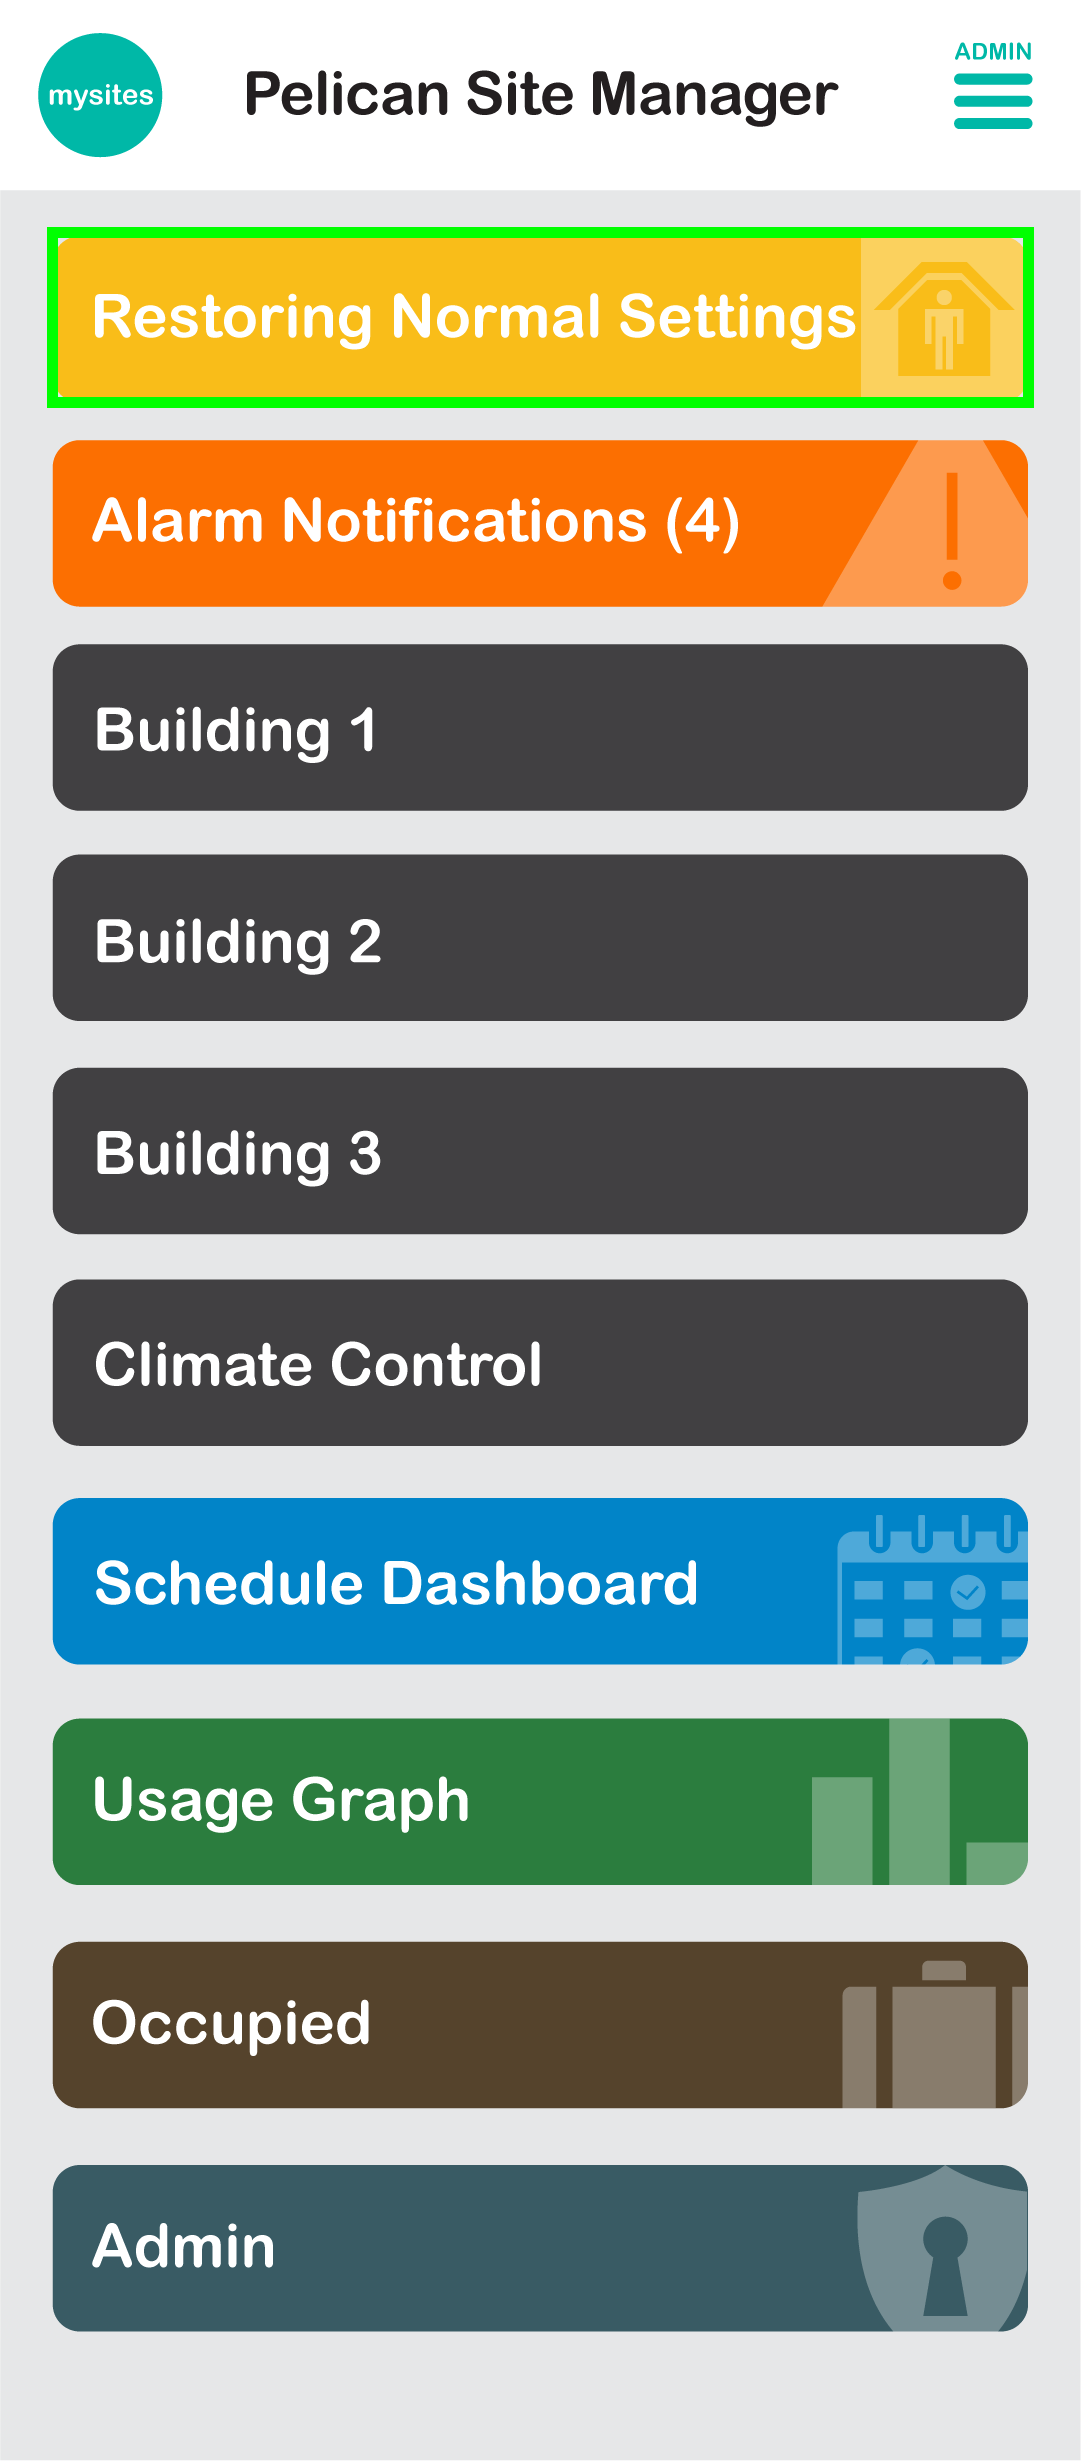
5. Once the yellow status bar disappears, your site will be function as normal.
How do I prepare for future Prevent Outside Ventilation events?
Poor outdoor air quality days are unpredictable. If Prevent Outside Ventilation is to be used during one of these days, it should be added to your preparedness plan and routinely checked to confirm proper sequencing and adjustments occur. Pelican Prevent Outside Ventilation is designed to assist in poor outdoor air quality days and is not guaranteed to work correctly if it has not been routinely checked.
Below are step-by-step recommendations to assist in routing checking of the prevent outdoor ventilation function of your Pelican solution:
1. In your emergency preparedness plans (if you do not have one, we recommend developing one), outline when prevent outdoor ventilation is required, the actions that should take place in order to successfully enact the sequence, and who is responsible for implementing the Pelican sequence.
2. We recommend a minimum of a Quarterly routine check of your Pelican solution, the equipment it is controlling, and proper sequencing of the Prevent Outdoor Ventilation sequence. This includes, but is not limited too:
- Verifying that all relevant Pelican devices are accessible and communicating with the Pelican app.
- Verifying that the notifications provided through your Pelican app have been checked for HVAC equipment faults and if mechanical faults are found, they have been remedied.
- Perform a Pelican Prevent Outside Ventilation test and record findings.
- Place Pelican back into normal operations and record findings.
Mechanical failures are the number one reason HVAC systems do not perform as expected during a Prevent Outside Ventilation event. It is important that HVAC equipment is routinely checked and all alarm notifications found with-in your Pelican app are visually checked and confirmed fixed.
If these steps are routinely followed, irregularities will be found and resolved before an actual high stress emergency situation.